This was so good I ate it before I got a picture! Next time I make it (because I definitely will be making it again!) I'll make sure to get a picture. This was pretty easy to make, and only four ingredients! Supergreat for those times when you want a fairly quick dinner, that's fairly light but tastey. Not to mention it's covered in cheese...and who doesn't want their dinner covered in cheese?!
Shopping List:
4 Chicken breasts (mine were about 6oz each)
Dash of olive oil (just over 1/2 tbs)
Salt and pepper to taste
1 Cup pasta sauce (I just discovered prego light and had to try it!)
6oz Shredded mozzarella (preferably reduced fat - either part skim or 2%)
Directions:
Preheat oven to 350. Then, drizzle a little olive oil in a skillet big enough for your chicken breasts. Heat the oil, and in the meantime pound the chicken so it's a little more even - I sandwiched the breats between two pieces of wax paper and pounded them with the heal of my hand.
Saute the chicken in the heated oil, adding a little salt and pepper to taste. Make sure to keep rotating those chickens! Otherwise they're going to burn. Keep turning and cooking till they're cooked through - about 18 minutes (I kept my pan on med-hi to med to make sure they didn't burn).
Pour a little of the pasta sauce in a casserole dish to cover the bottom. Dip each chicken breast in the sauce to coat. Pour the remaining sauce over the chicken breasts and top with the cheese.
Pop in the oven for a little bit, till the cheese melts, about seven minutes.
To get the cheese a little crispy on top, move the rack to the top and let it sit under the coil, but make sure to keep an eye on it! Also, I've done this before with "fancy shredded" mozzarella and it didn't turn out as well. I think the smaller shreds don't melt the same.
Nutrition Facts:
Cal - 325 Fat - 10 Pro - 48 Carb - 14 Sodium - 783
Yumminess - * * * * (out of five) - I think the chicken needed just a touch more seasoning, but the globs of cheese on top totally helped ;-)
Healthy-ness - Pretty good! 10gs of fat for a dinner? Not bad at all. And only 14 carbs!
Difficulty - Easy Peasey - very little skill required.
Total Time: About 28 minutes.
Wednesday, September 21, 2011
Been Too Long!
Sorry faithful readers! I've been off the radar for far too long.
I'm trying to get back on here, coming up with tasty easy dishes! I'm pulling away from sticking to one single cookbook, and am going to take a chance to dabble in a few different ones. I'll still be reviewing recipes like before, but in order to keep things light and healthy, I'll be tweaking them just a little.
On the menu tonight: Either chicken nuggets with fries, or chicken mozzerella (a spin on chicken parmesean). You'll have to stay tuned and be surprised to find which one wins the vote!
Thursday, June 16, 2011
Oatmeal Yogurt Muffins

This recipe has been passed around my group of friends like a case of beer. It’s originally my friend’s mom’s recipe, but we all make it all the time now! It’s a little more than the regular number of ingredients I like to keep things, but it’s simple enough. And so delicious! How can you go wrong with oatmeal and yogurt in muffin form? It’s a great little snack, and not too nutritionally bad for you. And you can make them whatever flavor you want just by changing the yogurt!
Shopping List:
¾ Cup Sugar
1 Stick of butter
1 Egg
1 Cup (8oz) of Yogurt (any flavor!)
1 Tsp. Vanilla
1 Cup Flour
1 Cup Oatmeal
1 Tsp. Baking soda
Preheat oven to 350 degrees.
In a medium bowl, combine sugar and butter, and mix until well blended. I soften the butter first, it makes it easier. Then add the egg and vanilla. Mix well! Toss in the yogurt (I use Yoplait light – red raspberry is my favorite) and mix, mix, mix! Add baking soda, flour, and oatmeal (all at once) and mix until blended. I mix by hand, but you can use a mixer if you’d like. The batter should be the density of cake batter. (I made the mistake of adding too much flour once, and the consistency was more like cookie dough. Easy to scoop into muffin tins, but made the muffins dry and tasteless). Pour into greased muffin tin (I use a ¼ cup measuring cup as my scooper) and bake for 15 – 20 minutes.
Makes 12 servings.
Nutrition facts (based on my recipe calculator and using Yoplait yogurt)
Cal – 182 Fat – 6 Pro – 3 Carb – 28 Sod – 99
Difficulty – Easy Peasy
Yumminess - * * * * * (Moist and delicious)
Healthy-ness – A little less calories, and definitely less fat per muffin than regular muffins. I’m trying to figure out a ratio to add protein powder to give them a little extra umph.
Total Time: About 25 minutes.
Back in Action
Sorry fellow bloggers, I took some time off!
But I'll be back in action within the next 24 hours. I already have a recipe I'm reviewing (litterally as we speak), and am looking up the next few I'm going to try. Hopefully I'll be back in the full swing of things shortly!
Thanks for reading! :-)
But I'll be back in action within the next 24 hours. I already have a recipe I'm reviewing (litterally as we speak), and am looking up the next few I'm going to try. Hopefully I'll be back in the full swing of things shortly!
Thanks for reading! :-)
Wednesday, March 30, 2011
Mexican Chicken Bake

Okay, don’t judge this recipe by its picture. I am not sure what inspired me to make this, but I’m glad I did! It was very filling. But it was also a lot of calories. I wish it wasn’t, because I would have eaten so much more! It was my first adventure with ground chicken…interesting for sure. Fairly easy to make, just not super healthy.
Shopping List:
1 Package corn bread mix (8.5 oz)
1/3 Cup nonfat milk
¼ Cup egg substitute
¾ Pound lean ground chicken (I used a pound, which I suggest. It adds about 75 calories per serving)
8oz Monterey jack cheese with jalapeno peppers (I got the wrong kind, but luckily had a can of diced jalapenos to add)
16oz refried beans (I went for the no fat ones, and saved 5 grams of fat per serving!)
Prepare corn bread mix with milk and egg substitute. Pour into an 8x8 pan sprayed with cooking spray and bake at 400 for 12 minutes. Do not allow to get brown! While that’s baking, brown chicken in a skillet. I took the time to season it as well, even though the recipe doesn’t call for it. When cooked through, remove from heat and add ¾ of cheese. Stir until cheese melts. Spread refried beans evenly over baked cornbread. Top with chicken mixture and remaining cheese. Bake at 350 for 15 minutes or until heated through. Cut into squares and serve!
Makes 6 servings
Nutrition facts (based on what the cookbook tells me, but may differ slightly depending on brands)
Cal – 482 Fat – 23 Pro – 18 Carb – 46 Fib – 7 Sod – 923
Difficulty – Some Skill Required (Doing two things at once! This takes just a little bit of concentration)
Yumminess - * * * * (Glad I seasoned the chicken!)
Healthy-ness – I think the only good thing about this dish is the protein and fiber. Not exactly low sodium! But I guess dinner for under 500 calories isn’t bad.
Total Time: About 35-40 minutes depending on how fast your chicken cooks.
Tuesday, March 29, 2011
Asparagus with Almonds

The boyfriend was making steak, I made the side dish. It wasn’t bad! I didn’t taste much of the almonds though, and I’d probably add more next time if I make it again. It was pretty easy too! Just slice, steam, sautee, and mix! If you’re a huge asparagus fan, than this is definitely for you.
Shopping List:
2 Pounds fresh asparagus (about two bundles)
1 Tbs soft tub margarine
1 Tbs slivered or sliced almonds
1 8oz can water chestnuts
Snap ends off of asparagus, then slice diagonally into 1 ½ inch pieces (I think that means at an angle). Place in a medium skillet with ¼ cup of water. Cover and steam over medium heat for about five minutes or until crisp tender. Drain off water and remove asparagus but keep warm (I just left mine in the collendar in the sink). Melt 1 ½ teaspoons (or half really) of the margarine in skillet. Add almonds and toast until golden. This won’t take long if you’re using sliced almonds. Add water chestnuts and heat through. Add asparagus and remaining margarine. Toss to mix, and heath though (I kept mine on the stove till my asparagus got really tender because that’s how I like it! Oh, I also added garlic.)
Makes 4 Servings
Nutrition facts
Cal – 119 Fat – 5 Pro – 7 Carb – 17 Fib – 5 Sod – 37
Difficulty – Easy Peasy
Yumminess - * * * * (Good compliment to steak)
Healthy-ness – Low cal, low fat, low sodium, high fiber! Doesn’t get any better than that!
Total Time: I cooked my asparagus a lot longer than the recipe said to, so I’m not sure. Sorry.
Saturday, March 26, 2011
Biscuits

I think everyone, at one time in their life, has made biscuits from bisquick. When I was younger, I was pretty sure that’s how biscuits were actually made, till my mom and I made “Drop Biscuits with Wendy” from one of her really old cook books. I hadn’t made them since…until now! Honestly, these didn’t turn out like I expected, and there is a lot that I would do differently next time. They didn’t taste bad, but they weren’t super great either. Next time, I’d make 9 instead of 12 because it was tough to get 12 out of that dough, and I’d go for the soft biscuit version, because they turned out like little hockey pucks (but soft on the inside). And for some reason I kept forgetting the instructions!
Shopping List:
2 Cups flour
½ Teaspoon salt
3 Teaspoons baking powder
1 Tablespoon, plus 2 teaspoons melted margarine (I use I can’t believe it’s not butter light)
¾ Cup nonfat milk
Preheat oven to 450. Mix flour, salt, and baking powder in a medium mixing bowl. In a separate dish, mix 1 tablespoon of margarine, and milk together. Add to the dry ingredients. Mix gently but quickly (I wasn’t sure what this meant, so I just mixed it like I normally would, but didn’t beat it to death). Dump onto a lightly floured surface and knead until smooth. Flatten out until about ¾ of an inch thick, and cut with a medium biscuit cutter (I used a cookie cutter!). Place on a baking sheet sprayed with nonstick spray, and bake 10-12 minutes.
Makes 12 biscuits
Nutrition facts (Per biscuit)
Cal – 95 Fat – 2 Pro – 3 Carb – 17 Fib – 1 Sod – 316
Difficulty – Some Skill Required (Not everyone knows how to knead, and it’s really hard to get the scraps to come back together to make more to cut out)
Yumminess - * * * (A little dry, and too crisp for my taste)
Healthy-ness – Can you really beat less than 100 cals for a biscuit? I mean, really?
Total Time: About 30 minutes. That’s actually a total guess
Thursday, March 24, 2011
BBQ Chicken Pizza
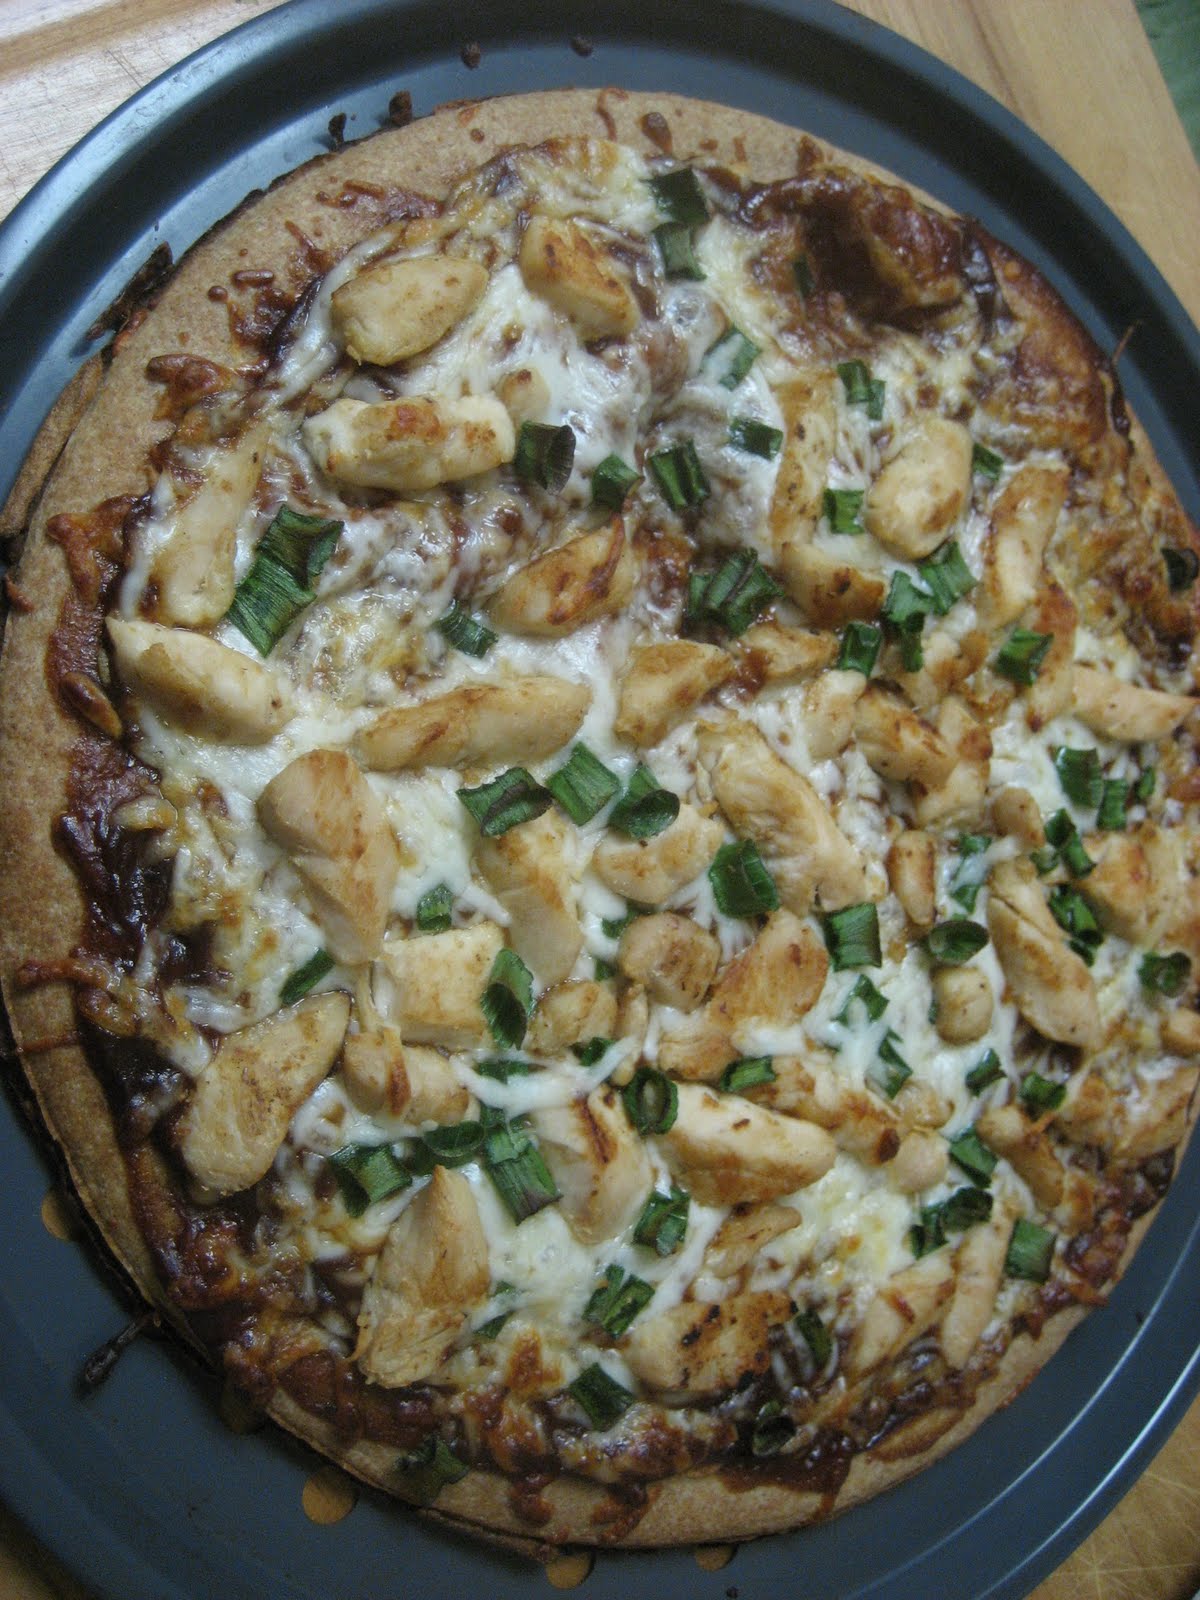
My boyfriend and I couldn’t agree on one thing for dinner, until I threw out pizza. I knew I had this recipe marked to try, so this was a good opportunity. It wasn’t complicated, and it was pretty delicious! I seasoned the chicken slightly, but I don’t think I needed to. The tangy bbq sauce was a dominate flavor, enough that the chicken didn’t taste bland at all. I would have liked to have more cheese on it, so I think next time I will! I also put bacon bits (my new favorite thing) on it…awesome addition!
Shopping List:
1 Chicken breast half (I used about five or six chicken breast tenders – easier to cut up into chunks)
1 Pre-made pizza crust (Like a bobali)
½ Cup BBQ sauce (or less if you don’t want it really saucy)
1 Cup low fat mozzarella cheese
¼ Cup green onions - chopped
Slice chicken, or cut into chunks, and cook in a skillet with cooking spray. Spread BBQ sauce on pizza crust. Layer cheese first, then chicken, then green onions. My tip is to not put all the cheese on the first layer, and then sprinkle a little more on top to finish it off. Bake at 450 for 10-15 minutes, depending on the pizza crust (Mine was a thin crust, so it took 11 minutes).
Makes 8 servings
Nutrition facts
Cal – 130 Fat – 2 Pro – 8 Carb – 18 Fib – 1 Sod – 326
Difficulty – Easy Peasy
Yumminess - * * * * * (Soooo good!)
Healthy-ness – Low fat Pizza! Also, pretty low calories. I had 4 slices last night!
Total Time: about 30 minutes (about 20 minutes to prep, 10 to cook)
Wednesday, March 23, 2011
Turkey Bacon Burgers

The boyfriend suggested burgers for dinner, and luckily, I had one marked for my project. (Side note: I might be running out of entrees soon!) He is kind of a skeptic when it comes to turkey burgers on the bbq, but he was willing to give it a shot. I have to admit, the cookbook nutrition facts seemed very low, so I double checked in a recipe calculator. With the amount of turkey I used (1.25 pounds instead of 1 pound) and the fact that I left the bacon on, the calories DEFINITELY changed. The nutrition facts I’ll provide will be how I calculated with 1.25 pounds of meat and leaving the bacon on. But back to the food, it was pretty good. I forgot to add the salt and pepper, and that was noticeable. But we topped them off with some caramelized onions and they were fabulous! I’d probably make them again, because they were pretty easy and didn’t take too long.
Shopping List:
1 Pound lean ground turkey
¾ Cup fresh whole wheat bread crumbs (I used white seasoned crumbs because that’s what I had!)
2 Egg whites (I know how to separate an egg pretty easily, so this didn’t scare me)
1 Tablespoon Worcestershire sauce
Salt and pepper to taste
6 Slices center cut bacon (I used 12 because then the patties could be flatter and bigger!)
Mix ground turkey, bread crumbs, egg whites, Worcestershire sauce, salt and pepper in a medium mixing bowl. Don’t be afraid to use your hands! It’s easier. Form meat into six patties and carefully wrap a slice of bacon around the edge (or use two if your patties are bigger like mine were). Secure bacon in place with a toothpick on connecting ends. Cook patties in a nonstick skillet, under broiler, or on a grill until cooked through, being careful not to cook all the way through. On the bbq, the bacon cooks up nice and crispy; otherwise, remove bacon and discard.
Makes 6 servings
Nutrition facts (based on the ingredients I used)Cal – 249 Fat – 11 Pro – 25 Carb – 10 Sod – 525
Difficulty – Easy Peasey (Just mix, slap, wrap and cook!)
Yumminess - * * * * (Definitely needed the salt and pepper)
Healthy-ness – About the same as a regular burger because of the bacon. Removing the bacon removes about 50 calories per burger.
Total Time: 20 minutes prep, 30 minutes on the grill; total 50 minutes.
Tuesday, March 22, 2011
Stuffed Potatoes

I was in the mood for twice baked potatoes, and I found this recipe! The recipe doesn’t call for cheese or bacon (because it’s healthy!) but you can always add those in if you want. These weren’t super easy, but not too difficult either, and they did take a long time. But the result was amazing! I was afraid of the dill weed, because I’ve never had it before, but it gave it a little something extra that I very much enjoyed. And I didn’t feel like I needed a lot of salt either! Definitely would add some cheese on top next time. Overall, super delicious compliment to chicken or steak. Sorry the picture isn’t super great, I almost forgot to take one.
Shopping List:
2 Large baking potatoes (I used russet)
2 Tbs soft tub margarine (I use I can’t believe it’s not butter light)
2 Tbs light sour cream
1/4 Tsp dried dill weed
Up to 4 Tbs nonfat milk (Depending on how creamy you want the stuffing)
Salt and Pepper to taste
Rinse off potatoes and poke all over with a fork. Option 1: wrap in tin foil, place on cookie sheet, and bake in 450 degree oven for about 50-60 minutes (or until tender). Option 2: microwave for about 10 minutes, then bake in 450 degree oven for about 20-30 minutes (or until tender). I, the lazy chef, of course did option 2. Remove from oven and cut in half length wise. Allow to cool before scooping! Carefully scoop out potato insides, leaving about ¼ inch shell, into a mixing bowl. Add margarine, sour cream, and dill weed, and mix till smooth. Add milk to reach desired creaminess, and salt and pepper to taste. Reduce oven heat to 350, and bake for another 10 minutes.
Makes 4 servings
Nutrition facts (based on what the cookbook tells me, but may differ slightly depending on butter and sour cream brands)
Cal – 139 Fat – 6 Pro – 3 Carb – 18 Fib – 1 Sod – 118
Difficulty – Some Skill Required (Scooping the potatoes took some talent!)Yumminess - * * * * * (Even without cheese on top, it’s still 5 stars delicious)
Healthy-ness – About half the calories and fat of a normal twice baked potato, so have twice as many!
Total Time: Didn’t keep a close eye, so probably about One Hour
Monday, March 21, 2011
Bisquick "Protein" Muffins


I put protein in quotations, because it's only 8 grams per muffin, which doesn't seem like all that much. I found this recipe on MyFitnessPal.com under some random forum post. It sounded interesting, so I thought I’d give it a try! It looks a little funky before you bake it (Bottom picture) but afterwards, it looks totally normal! (Top picture) They taste a little like bran muffins, so I think next time I’ll add more sugar, more cinnamon, or use splenda (because it has a more concentrated taste than sugar). But overall, they’re pretty good! I’ve only eaten one, and it was plain, so it might be good with some butter or jam.
Shopping List:
2 Cups Heart healthy Bisquick
1 Cup low fat cottage cheese
2 Scoops protein powder (I used Pure Protein, vanilla flavor)
½ Cup applesauce
½ Cup skim milk
1 Tbs cinnamon
2 Tsp baking soda
1 Tsp sugar
Shopping List:
2 Cups Heart healthy Bisquick
1 Cup low fat cottage cheese
2 Scoops protein powder (I used Pure Protein, vanilla flavor)
½ Cup applesauce
½ Cup skim milk
1 Tbs cinnamon
2 Tsp baking soda
1 Tsp sugar
Preheat oven to 450. Mix dry ingredients in a medium to large mixing bowl, and mix wet ingredients – cottage cheese, apple sauce and skim milk – in a smaller bowl. When wet ingredients are fairly blended (cottage cheese curds will still be present), mix all together. Mix until semi-thick, like thick cake batter. If you’re afraid of it getting too runny, start with ¼ cup milk, and slowly add more. Pour in to greased muffin pan (I didn’t grease mine enough on the top edges – they do pop over!). Bake for 10 minutes, or until a toothpick can come out clean from the center. Let cool before trying to remove – you may need the help of a knife to wiggle them out, as they are kind of sticky.
Makes 12 muffins
Nutrition facts (per muffin)
Cal – 117 Fat – 2 Pro - 8 Carb –10 Fib – ? (my recipe builder didn’t track it) Sod – 460
Difficulty – Easy Peasy! Even though there are a lot of ingredients, they’re all measured similarly, and it’s really just mix and bake!
Yumminess - * * * (Like I said, kind of a bran muffin taste, but not bad)
Healthy-ness – Way lower calories than another muffin, and they’re full sized! Fat is low enough too that you could butter them. Just keep an eye on the sodium.
Total Time: about 40 mins (includes baking time – and that’s a total guess)
Saturday, March 19, 2011
Barbeque Sauce and Green Bean Medley (double post!)

Barbeque Sauce:
I have never made barbeque sauce before, so this was certainly an adventure. It had a little more of a vinegar taste to it than I prefer, and not as spicy as I expected, but I put it on a steak and it was awesome! So easy too. If you know how to chop and onion and measure, you can make barbeque sauce! Next time (because I’m DEFINITELY making it again), I’m going to use it as I grill meat – slathering it on as it cooks. Mm Mm Mm!
Shopping List:
Onion (only about a third of it or ½ cup finely chopped)
8oz Tomato sauce
3 Tbs brown sugar (I used dark)
2 Tsp chili powder
1/3 Cup cider vinegar
1/8 Tsp Tabasco (I didn’t really measure, I kind of just shook it in till it looked good)
First, chop the onion finely (I didn’t do it too fine, but I should have). Combine tomato sauce, brown sugar, chili powder, cider vinegar and Tabasco in a small sauce pan. Heat on medium high, and as it starts to boil, add onion. Bring to a boil, then reduce heat to medium and let simmer for about 7 minutes.
Makes about 1 ¼ cups of sauce
Nutrition facts (per tablespoon)
Cal – 15 Fat – < 1 Pro – < 1 Carb – 4 Fib – < 1 Sod – 6
Difficulty – Easy Peasy! If you know how to chop, you can make this.
Yumminess - * * * (Like I said, it was a little more vinegary than I would have liked)
Healthy-ness – Nice low sodium, low carbs, and low cals! Compared to most bbq sauces with 75 cals per tbs, and over 100g sodium.
Total Time: about 20 mins (includes onion chopping time)
Green Bean Medley:
Sorry, no picture, I forgot. This wasn’t bad! And again, super easy. I would have liked more bacon flavor, so I think next time I would sauté the bacon and the onions together before adding the green beans. Also, I might lower the heat and put a lid on it so that all the flavors meld together nicely.
Shopping list:
1/3 Cup finely chopped onion (about a third of an onion)
1 Tsp soft tub margarine (I accidentally started melting a tbs! So I quickly corrected myself)
2 Strips bacon, cooked and crumbled (Lazy Chef Tip: Most stores sell pre-cooked and crumbled real bacon bits. One tablespoon equals one slice of bacon – that’s what I used. Saved time!)
16oz can of Green beans (Fancy cut, not sliced)
Salt and Pepper to taste
Have at it with that onion! Chop chop chop, then cook in margarine in a non-stick skillet about five or six minutes. Drain green beans, and add to onion, then add bacon. Salt and pepper to your fancy, cook until heated (about another seven minutes), stirring frequently.
Makes 4 fairly large servings
Nutrition Facts (per serving):
Cal – 67 Fat – 3 Pro –3 Carb – 9 Fib – 2 Sod – 362
Difficulty – Easy Peasy! Pretty much just heat and serve.
Yumminess - * * * (Like I said, I’d like more bacon flavor)
Healthy-ness – Sodium is a little high, but everything else is nice and low! Makes a great side.
Thursday, March 17, 2011
Easy Beef Tacos

I didn’t really have a craving for tacos, but I had a craving for something other than chicken. This seemed like a good solution! AND it didn’t seem like it would take that long. Usually when I see the words “Easy” or “Quick” in a cookbook, my first thought is “Pft, yeah right.” My second thought is “I totally want to make that now.” This time, it worked in my favor. The salsa had a kick, but not too much; the beef was filling and low in fat; and to top it all off with a dollop of sour cream? Delish. Very pleased with this recipe, and how it turned out, and how little time and effort it took. I may make it every day!
Shopping List:
1Pound extra lean ground beef (I used 96/4 – meat/fat)
1 ¼ Cups salsa (I went with the lowest in sodium I could find)
10 Packaged taco shells
Reduced fat shredded cheddar (I used cheddar jack, it has the same nutritional value)
Shredded lettuce
Chopped tomatoes
Heat oven to 325 for taco shells. Meanwhile, brown ground beef in a medium skillet (no need to add seasoning!). Pour in colander to drain off all fat. Return to skillet and stir in salsa. Bring to a boil (I did a slight boil, because I was afraid of the splatter factor); reduce heat to medium or medium-low and simmer until liquid is absorbed (about 10-15 minutes).
Meanwhile (as oven should be heated) place taco shells on a cookie sheet and bake for 6-8 minutes. *Side-note: I stirred the meat occasionally to get the juices covering all the meat, because the salsa I used wasn’t super liquidy. It got more liquidy after I stirred it a few times. Spoon some of the meat mixture into each taco shell. Top each with some of the cheese, lettuce and tomatoes. (As you may have picked up, I HATE TOMATOES so that’s why my tacos pictured above are tomato free)
Makes 10 tacos
Nutrition Facts (Per Taco, including shell)
Cal – 172 Fat – 9 Pro – 13 Fiber – 2 Carb – 12 Sodium – 202
Difficulty – Easy Peasey! (Seriously, it’s pretty much no skill required except for heat and stir)
Yumminess - * * * * (They were pretty delicious, but I could have used spicier salsa)
Healthy-ness – Relatively low fat per taco, but having many more than that you’ll need to keep an eye on it; Low sodium bonus!
Total Time: Approximately 20 minutes (Did not include the intricate spooning-mean-into-tacos time)
Wednesday, March 16, 2011
Pasta with Artichoke Tomato Sauce
I’m not going to lie, this didn’t sound all that appetizing when I picked it. I picked it out a couple days in advance in order to get shopping done in one swoop, and I think I was hoping I would be in the mood for it. I wasn’t. I’m not a fan of vinegar or tomatoes, two things this recipe has. It wasn’t unbearable, it just didn’t hit the spot for me. And holy shit! Chopping canned tomatoes is HARD! So is slicing marinated artichoke hearts. I didn’t do things in complete order according to the recipe, because I was soo tired (didn’t start making dinner till 8!) My boyfriend really enjoyed it, but I’m not sure if he was humoring me. I won’t be making it again.
Shopping List:
6oz Jar of marinated artichoke hearts
2 Garlic cloves, minced (I used Christopher farms pre-minced)
28 oz Can of whole tomatoes, drained and coarsely chopped
1/8 Teaspoon freshly ground black pepper
8 Ounces of uncooked mostaccioli noodles (I did penne, because they’re pretty much the same)
4 Teaspoons grated parmesan
Put water on to boil for the pasta. Cook noodles according to directions on the package; drain. Meanwhile (I actually sat back and did nothing, huge mistake), drain artichokes, reserving 1 tablespoon (I did about 1 ½ tablespoons) of the marinade. Thinly slice artichokes crosswise (I think this means “hamburger” style), discarding any tough outer leaves (which were A LOT! Also, the marinade made the artichokes very slippery and they did not want to cooperate with my semi-dull knife).
In medium skillet (I used the pot I boiled the pasta in, because I let the pasta boil ahead of time), heat the reserved marinade. Add garlic and quickly sauté until soft, but not browned (I think it was about three minutes on medium heat). Add chopped tomatoes (I was chopping tomatoes as the garlic was sautéing), artichokes and pepper. Bring to a boil; reduce heat and simmer 15 to 20 minutes (It’s surprising, but the tomatoes give it some extra juice that does boil. I however was impatient and didn’t let it simmer the whole time). Place noodles on large serving platter, top with sauce and sprinkle with Parmesan (I mixed mine together in the pot I boiled the pasta in, but it was a little too small and we had some penne runaways).
Makes 4 large servings
Nutritional Facts:
Cals – 337 Fat – 5 Carb – 63 Pro – 12 Fib – 4 Sodium – 498
Ratings:
Difficulty – Some Skill Required (Chopping the tomatoes and slicing the artichoke wasn’t easy, but all the steps were)
Yumminess - * * (What saved it, was the herbed chicken I added on top)
Healthy-ness – Not too bad calories wise, but keep an eye on your carbs and sodium!
Total Time: Gosh, probably about 20 minutes, because I didn't let it simmer the whole time. But I was also making chicken at the same time, so that could be a little off.
OH! And I'm going to try and have pictures of meals, I forgot last night.
Monday, March 14, 2011
Chicken Fajitas
Tonight, the ever anticipated first night, I decided to make Chicken Fajitas. Not too complicated in terms of number of ingredients and effort in preparation, but it felt like a lot of steps. Mostly the amount of slicing of the bell peppers and onions – and boy oh boy did those onions make me cry – but I got through it injury free. In actuality, it wasn’t all that complicated, and I’d make it again with a few adjustments. First, I’d make sure I have enough lime juice! And be sure to add chili powder to give the chicken a kick. I added avocado (because I LOVE them!) which was nice, but I’m not sure I’d keep it. Maybe if it were mixed in some homemade salsa.
Shopping List:
4 Chicken breast halves (I used 1.64 pounds of chicken breast tenders because I’m lazy, and didn’t want to debone the breast halves)
2 Garlic cloves, chopped fine
¼ Cup lime juice
1Tablespoon olive oil
¼ Teaspoon paprika
½ Red Pepper
½ Green Pepper
2 Onions
Salt and Pepper to taste
Cut chicken into strips (however suits your fancy really; mine was kind of chunked). In a medium bowl, mix garlic and lime juice. Add chicken, toss to coat, and allow to marinate for about 45 minutes. When ready, drain liquid; cook in a non-stick pan sprayed with vegetable cooking spray until lightly browned and cooked through.
Meanwhile, slice bell pepper halves and onion (separate onion rings!). Heat olive oil in a large (and I mean large! I had to switch pans because the onions were too much) skillet, then stir in paprika. Add onions and allow to cook slightly before adding pepper. Continue to cook over medium heat, until vegetables are just crisp tender.
If you so desire, place tortillas – wrapped in foil – in the oven at 350 until warm. I (The Lazy Chef) popped mine in the microwave.
Chicken and veggies make enough for 8 fajitas, 2 with two fajitas per serving (i.e. 4 servings)
Nutritional Info (Chicken and Veggies)
Calories – 249 Fat – 4 Carbs – 9 Protein – 43 Sodium – 201
Ratings:
Difficulty – Some Skill Required (slicing veggies, watching two skillets at once and time for marinating)
Yumminess - * * * (Out of five, would have liked chicken to have a little more pizzazz)
Healthy-ness – Very low in fat (awesome!) and a small amount of cals. Overall, pretty good for any diet you may be on, just make sure the rest of your toppings (like sour cream or avocado) don’t set you over the edge!
Total Time: One Hour and Fifteen Minutes (Includes 40 minutes of marinating time for chicken - during which I had a snack)
New Adventures of Good Old Me
Today is the day! I've been anticipating this for almost a week now.
The Task: Cook my way through one of my cookbooks (leaving out the gross stuff like seafood).
The Book: Six Ingredients or Less Cooking Light.
The Contender: Me! Lazy when it comes to the kitchen, and will do whatever it takes to have dinner ready almost instantly. Not very savvy when it comes to mixing flavors, and eager to learn a plethora of healthy recipes.
80 recipes, 80 days, 1 kitchen, 1 blog. Wish me luck!
Subscribe to:
Posts (Atom)